WordPress: Designing a Custom Page Template (Part 2)
What’s in this Tutorial
This is Part Two of a three part tutorial on creating custom page templates for WordPress. In this tutorial I will be covering the process of translating design into code for a page template. We will take a look at:
- Planning the markup based on the design.
- Coding the layout into HTML and adding responsive classes (based on the grid included in the Bones Starter Theme).
- Adding our dummy content and any additional CSS.
Click here to read Part 1: Designing a Custom Page Template
Step 1: Planning the Markup
It’s important to put some thought into the way you will markup your page before jumping into it. Some things to consider include:
- How is the current theme structured/coded? (are they using HTML5, are they using things like <section>’s, do we need to wrap elements in rows etc.)
- Is the theme responsive? If so, which of the elements on the page need some extra attention? (what will happen on mobile/tablet, what elements need hidden on smaller devices etc.)
- What elements is our theme already using that we can utilize without reinventing the wheel? (is the site using a responsive framework, are there styles for things like buttons, headings and images that we can use etc.)
NOTE: It’s best practice to adapt your code to what your theme is already doing, copy their “code style”.
The first thing we are going to do is take a look at what our theme is doing, we can then begin our planing.
Most themes should have a file called page.php, if you don’t have this file in your theme, you can look at index.php.
In this example, we have been using the Bones Starter Theme. Below is the code for the page.php file in the Bones theme.
<?php get_header(); ?>

	<div id="content">

		<div id="inner-content" class="wrap clearfix">

				<div id="main" class="eightcol first clearfix" role="main">

					<?php if (have_posts()) : while (have_posts()) : the_post(); ?>

					<article id="post-<?php the_ID(); ?>" <?php post_class( 'clearfix' ); ?> role="article" itemscope itemtype="http://schema.org/BlogPosting">

						<header class="article-header">

							<h1 class="page-title"><?php the_title(); ?></h1>
							<p class="byline vcard"><?php
								printf( __( 'Posted <time class="updated" datetime="%1$s" pubdate>%2$s</time> by <span class="author">%3$s</span>.', 'bonestheme' ), get_the_time( 'Y-m-j' ), get_the_time( __( 'F jS, Y', 'bonestheme' ) ), bones_get_the_author_posts_link() );
							?></p>

						</header>

						<section class="entry-content clearfix" itemprop="articleBody">
							<?php the_content(); ?>
						</section>

						<footer class="article-footer">
							<p class="clearfix"><?php the_tags( '<span class="tags">' . __( 'Tags:', 'bonestheme' ) . '</span> ', ', ', '' ); ?></p>

						</footer>

						<?php comments_template(); ?>

					</article>

					<?php endwhile; else : ?>

							<article id="post-not-found" class="hentry clearfix">
									<header class="article-header">
										<h1><?php _e( 'Oops, Post Not Found!', 'bonestheme' ); ?></h1>
								</header>
									<section class="entry-content">
										<p><?php _e( 'Uh Oh. Something is missing. Try double checking things.', 'bonestheme' ); ?></p>
								</section>
								<footer class="article-footer">
										<p><?php _e( 'This is the error message in the page-custom.php template.', 'bonestheme' ); ?></p>
								</footer>
							</article>

					<?php endif; ?>

				</div>

				<?php get_sidebar(); ?>

		</div>

	</div>

<?php get_footer(); ?>
After taking a look at the code from page.php, I also explored the CSS and a couple of other theme files to gather information.
Here are some general notes I made while considering what is in the file currently, and what we need our new page template to be when it’s finished:
- Responsive columns* add up to 12 (the
#main divhas a class of.eightcol, if you opensidebar.php, that<div>has a class of.fourcol, 8 + 4 = 12) and the first and last columns have a class of.firstand.lastrespectively. - The theme is using HTML5 markup, but it’s also using
<article>tags, author information and post time/meta data. Since we are creating a home page, I will remove these. - The theme does have CSS for buttons and headings already setup, but we may have to add a bit of additional CSS.
*These responsive columns (.onecol, .twocol, .threecol etc. with lasses of .first and .last) are part of the grid that is built into the Bones theme, most likely these won’t do anything in your theme. If you have a theme that is responsive, you need to look into what framework they are using in order to add the right classes.
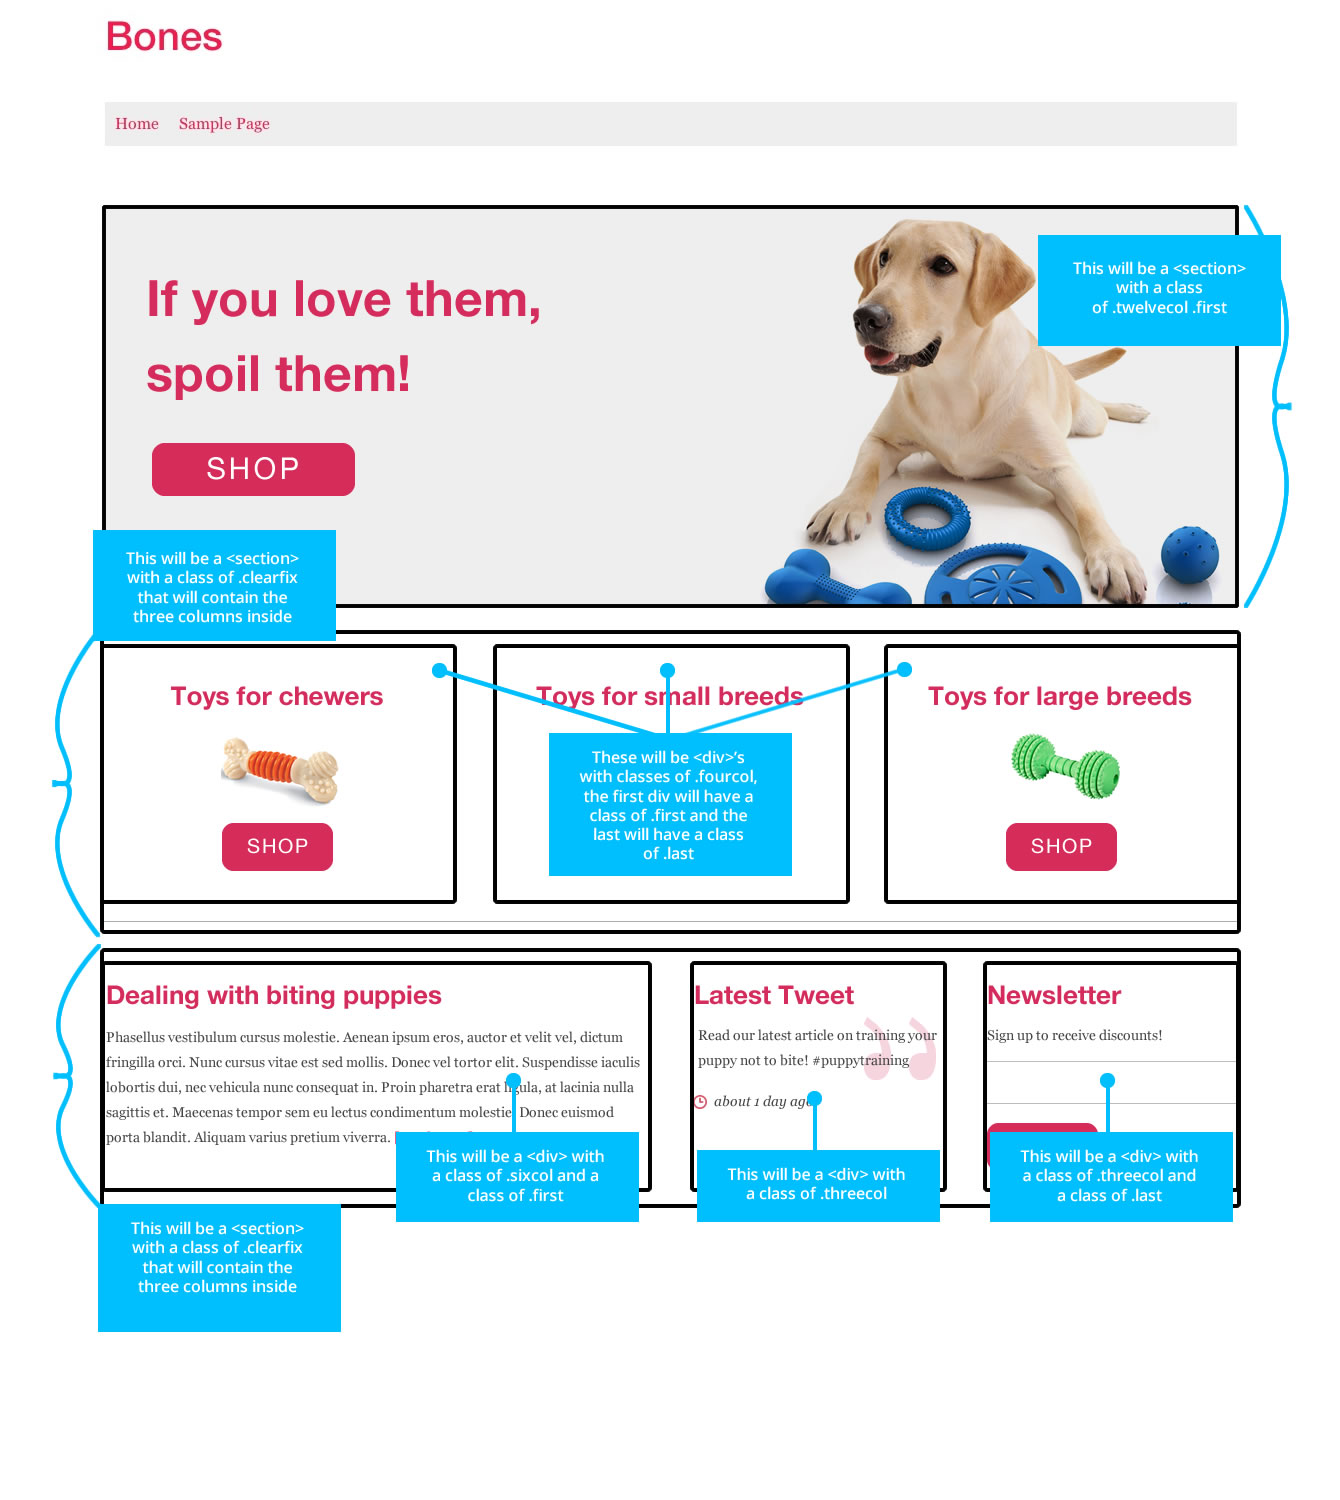
Now I’m going to add some notes on top of our finished mockup so you can visualize what I’ve planned based on the exploration we just did:
Step 2: Coding the layout into HTML
Now that we have a solid plan, let’s code this out.
Step 2.1: Stripping out what we don’t need
- First things first, make a copy of your
page.php(orindex.phpif that’s the file you’ve been consulting). You can name this whatever you want, but I typically name my custom templates like this so they are easy to find:template-something.php, so in this casetemplate-home.php. From now on, this is the file we will make changes to…leavepage.phpthe way you found it. Make sure you keep this new file in the same directory aspage.phpso that WordPress can find it. - I’m going to start by removing all of the
<article>,<header>and<footer>tags and their contents — these don’t make sense for our home page since there are no posts being displayed. - I’m am NOT going to remove the
<section>tags within<article>, we will use this. - I’m removing
itemprop="articleBody"from<section>because again, this is not a blog post. - I am also removing
<?php comments_template(); ?>, again this doesn’t fit on our home page, we don’t need to see comments. - In addition, I’m removing
<?php get_sidebar(); ?>. We are not using a sidebar in our mockup, so we don’t want to call one.
Our new stripped code looks like this:
<?php get_header(); ?>

	<div id="content">

		<div id="inner-content" class="wrap clearfix">

			<div id="main" class="eightcol first clearfix" role="main">

				<?php if (have_posts()) : while (have_posts()) : the_post(); ?>

					<section class="entry-content clearfix">
						<?php the_content(); ?>
					</section>

				<?php endwhile; else : ?>

					<section class="entry-content">
						<p><?php _e( 'Uh Oh. Something is missing. Try double checking things.', 'bonestheme' ); ?></p>
					</section>

				<?php endif; ?>

			</div>

		</div>

	</div>

<?php get_footer(); ?>
Step 2.2: Adding our custom markup
Now that we have everything cleaned up, we can add the markup we planned in Step 1. Here is a breakdown of what I’m adding:
First, and most importantly, I’m adding some markup at the top of the page to let WordPress know this is a page template. Once this code is added, you will be able to find this page as an option in the “Template” dropdown. You can name this whatever you want, the “name” is whatever you type after the colon. The custom page template syntax looks like this:
<?php
/*
Template Name: Home Page
*/
?>
- We need to change the
.eightcolclass on the#main <div>to.twelvecolsince we removed the sidebar and need this to be a full width column. - Two more
<section>'swith.clearfixclasses (note that column classes need.clearfixclasses as well) - Three
.fourcolcolumns in<section>one. - One
.sixcoland two.threecolcolumns in<section>two.
Our new code (including the template syntax) looks like this:
<?php
/*
Template Name: Home Page
*/
?>

<?php get_header(); ?>

	<div id="content">

		<div id="inner-content" class="wrap clearfix">

			<div id="main" class="twelvecol first clearfix" role="main">

				<?php if (have_posts()) : while (have_posts()) : the_post(); ?>

					<section class="entry-content clearfix">
						<?php the_content(); ?>
					</section>

					<section class="entry-content clearfix">

						<div class="fourcol first clearfix">
						</div>

						<div class="fourcol clearfix">
						</div>

						<div class="fourcol last clearfix">
						</div>

					</section>

					<section class="entry-content clearfix">

						<div class="sixcol first clearfix">
						</div>

						<div class="threecol clearfix">
						</div>

						<div class="threecol last clearfix">
						</div>

					</section>

				<?php endwhile; else : ?>

					<section class="entry-content">
						<p><?php _e( 'Uh Oh. Something is missing. Try double checking things.', 'bonestheme' ); ?></p>
					</section>

				<?php endif; ?>

			</div>

		</div>

	</div>

<?php get_footer(); ?>
Step 3: Adding Dummy Content
Now that we have all of our code in place, let’s throw in our dummy content. We will include any additional markup we need to get our page looking like our mockup. In the next tutorial, we will hook this up to WordPress so we can grab content from the admin, but for now our content will be static.
NOTE: I want to note that this step is not necessary and is not a part of my normal process. I’m adding this step so you can have some hands on experience and better understand what will be happening in Part 3 of this tutorial.
Step 3.1: Adding the content
I sliced and exported the images from the mockup including the “slide” from the top of the page. I saved these in the image folder of the Bones theme. I’m using get_template_directory_uri(); to grab the URL for the theme’s directory and then adding the rest of the file paths for the images. Other than that, you can see I’ve only used basic HTML to add the content we had laid out previously.
Note that I also used the class of .button on a few elements. From the exploration we did earlier, I learned that our theme already had a class for this.
Here is the code as it stands now with all of our dummy content:
<?php get_header(); ?>

	<div id="content">

		<div id="inner-content" class="wrap clearfix">

			<div id="main" class="twelvecol first clearfix" role="main">

				<?php if (have_posts()) : while (have_posts()) : the_post(); ?>

					<section class="entry-content clearfix">

						<div id="slider">

							<img src="<?php echo get_template_directory_uri(); ?>/library/images/slide.jpg" alt="Dog Slide" />

						</div>

					</section>

					<section class="entry-content clearfix">

						<div class="fourcol first clearfix">

							<h2><a href="#">Toys for chewers</a></h2>
							<img src="<?php echo get_template_directory_uri(); ?>/library/images/toy-1.jpg" alt="Dog Toy" />
							<div class="clearfix">
								<a class="button" href="#">Shop</a>
							</div>
						</div>

						<div class="fourcol clearfix">

							<h2><a href="#">Toys for small breeds</a></h2>
							<img src="<?php echo get_template_directory_uri(); ?>/library/images/toy-2.jpg" alt="Dog Toy" />
							<div class="clearfix">
								<a class="button" href="#">Shop</a>
							</div>

						</div>

						<div class="fourcol last clearfix">

							<h2><a href="#">Toys for large breeds</a></h2>
							<img src="<?php echo get_template_directory_uri(); ?>/library/images/toy-3.jpg" alt="Dog Toy" />
							<div class="clearfix">
								<a class="button" href="#">Shop</a>
							</div>

						</div>

					</section>

					<section class="entry-content clearfix">

						<div class="sixcol first clearfix">

							<h2><a href="#">Dealing with biting puppies</a></h2>
							<p>Phasellus vestibulum cursus molestie. Aenean ipsum eros, auctor et velit vel, dictum fringilla orci. Nunc cursus vitae est sed mollis. Donec vel tortor elit. Suspendisse iaculis lobortis dui, nec vehicula nunc consequat in. Proin pharetra erat ligula, at lacinia nulla sagittis et. Maecenas tempor sem eu lectus condimentum molestie. Donec euismod porta blandit. Aliquam varius pretium viverra. <a href="#">[Read More]</a></p>

						</div>

						<div class="threecol clearfix">

							<h2><a href="#">Latest Tweet</a></h2>
							<p>Read our latest article on training your puppy not to bite! #puppytraining</p>
							<p><em>about 1 day ago</em></p>

						</div>

						<div class="threecol last clearfix">

							<h2><a href="#">Newsletter</a></h2>
							<p>Sign up to receive discounts!</p>
							<input type="text" />
							<input class="button" type="submit" value="Submit" />

						</div>

					</section>

				<?php endwhile; else : ?>

					<section class="entry-content">
						<p><?php _e( 'Uh Oh. Something is missing. Try double checking things.', 'bonestheme' ); ?></p>
					</section>

				<?php endif; ?>

			</div>

		</div>

	</div>

<?php get_footer(); ?>
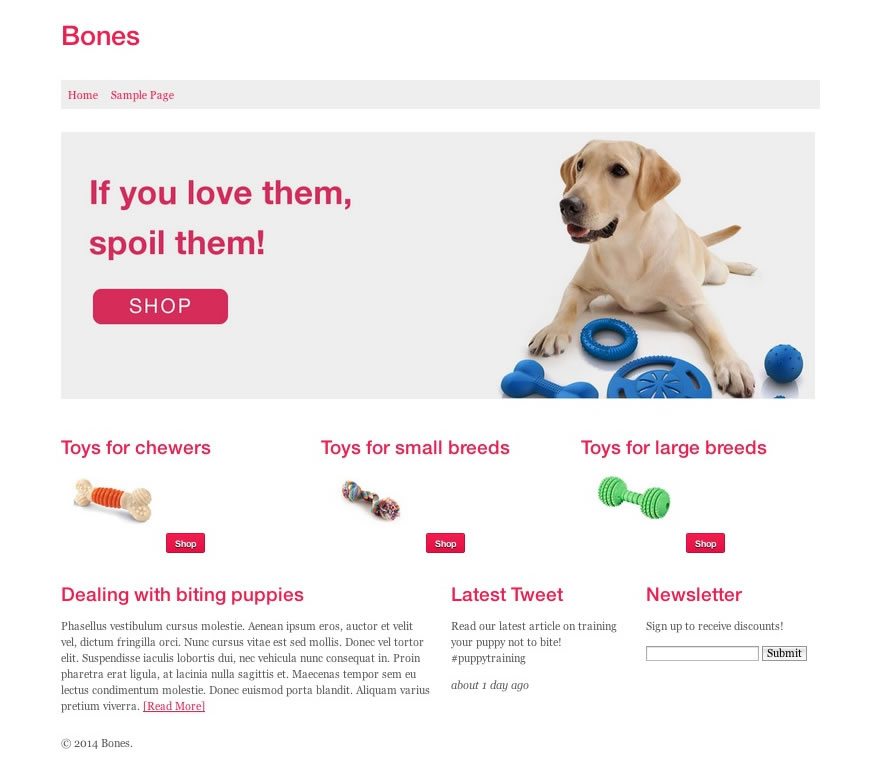
…and here is a snapshot from the browser of what this page looks like with the above code:
This is pretty close! Since we stuck with a design that flowed from our original theme, we don’t have a whole lot of work to do.
Step 3.2: Adding/altering CSS
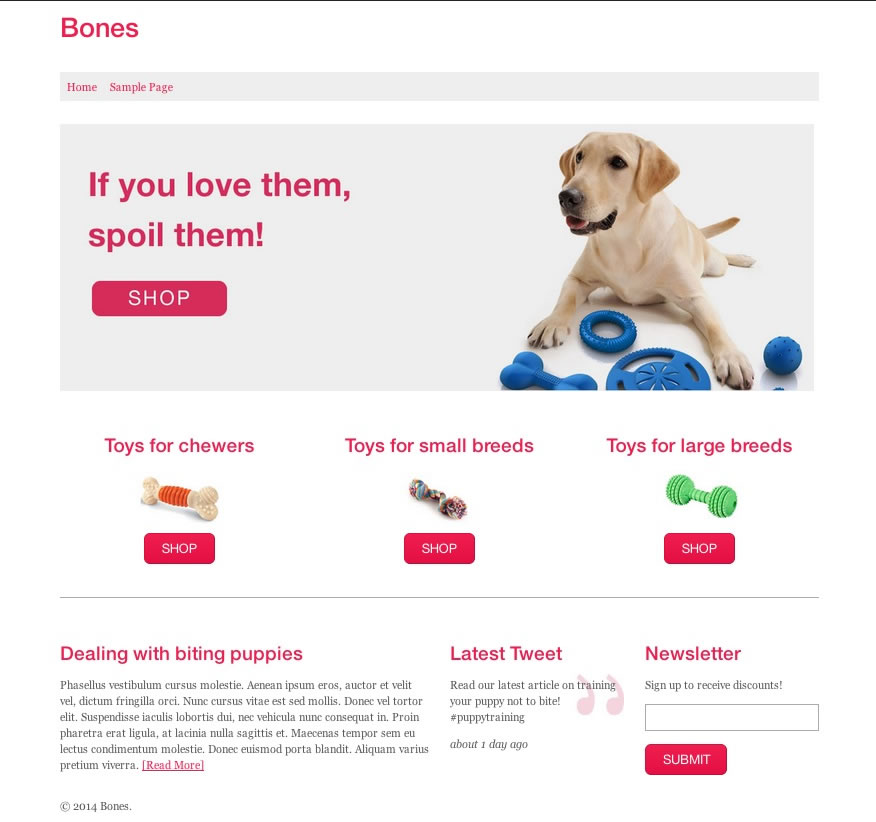
I’m adding some CSS to get this finished up for us, here are the notes:
- Adding a class to the
<section>that contains our products called.products - Styling the
.productsclass to center the content in it’s child<div>'s, to have some more padding, a margin and a dividing line - Adjusting the existing
.buttonclass to match our new style - Adding a class of
.tweetto the<div>around our twitter feed - Styling
.tweetto use a background with our quote image - Styling the input box for the newsletter form
Here is the markup with these new classes added in:
<?php
/*
Template Name: Home Page
*/
?>

<?php get_header(); ?>

	<div id="content">

		<div id="inner-content" class="wrap clearfix">

			<div id="main" class="twelvecol first clearfix" role="main">

				<?php if (have_posts()) : while (have_posts()) : the_post(); ?>

					<section class="entry-content clearfix">

						<div id="slider">

							<img src="<?php echo get_template_directory_uri(); ?>/library/images/slide.jpg" alt="Dog Slide" />

						</div>

					</section>

					<section class="products entry-content clearfix">

						<div class="fourcol first clearfix">

							<h2><a href="#">Toys for chewers</a></h2>
							<img src="<?php echo get_template_directory_uri(); ?>/library/images/toy-1.jpg" alt="Dog Toy" />
							<div class="clearfix">
								<a class="button" href="#">Shop</a>
							</div>

						</div>

						<div class="fourcol clearfix">

							<h2><a href="#">Toys for small breeds</a></h2>
							<img src="<?php echo get_template_directory_uri(); ?>/library/images/toy-2.jpg" alt="Dog Toy" />
							<div class="clearfix">
								<a class="button" href="#">Shop</a>
							</div>

						</div>

						<div class="fourcol last clearfix">

							<h2><a href="#">Toys for large breeds</a></h2>
							<img src="<?php echo get_template_directory_uri(); ?>/library/images/toy-3.jpg" alt="Dog Toy" />
							<div class="clearfix">
								<a class="button" href="#">Shop</a>
							</div>

						</div>

					</section>

					<section class="entry-content clearfix">

						<div class="sixcol first clearfix">

							<h2><a href="#">Dealing with biting puppies</a></h2>
							<p>Phasellus vestibulum cursus molestie. Aenean ipsum eros, auctor et velit vel, dictum fringilla orci. Nunc cursus vitae est sed mollis. Donec vel tortor elit. Suspendisse iaculis lobortis dui, nec vehicula nunc consequat in. Proin pharetra erat ligula, at lacinia nulla sagittis et. Maecenas tempor sem eu lectus condimentum molestie. Donec euismod porta blandit. Aliquam varius pretium viverra. <a href="#">[Read More]</a></p>

						</div>

						<div class="tweet threecol clearfix">

							<h2><a href="#">Latest Tweet</a></h2>
							<p>Read our latest article on training your puppy not to bite! #puppytraining</p>
							<p><em>about 1 day ago</em></p>

						</div>

						<div class="threecol last clearfix">

							<h2><a href="#">Newsletter</a></h2>
							<p>Sign up to receive discounts!</p>
							<input type="text" />
							<input class="button" type="submit" value="Submit" />

						</div>

					</section>

				<?php endwhile; else : ?>

					<section class="entry-content">
						<p><?php _e( 'Uh Oh. Something is missing. Try double checking things.', 'bonestheme' ); ?></p>
					</section>

				<?php endif; ?>

			</div>

		</div>

	</div>

<?php get_footer(); ?>
…and here is the CSS I wrote:
   .products {
   		padding: 10px 0px 30px;
   		margin-bottom: 40px;
   		text-align: center;
   		border-bottom: 1px #AAA solid;
   }

   .products img {
   		margin: 0px auto;
   }

   .button {
   		padding: 12px 25px;
   		font-size: 20px;
   		text-transform: uppercase;
   		font-weight: normal;
   		text-shadow: none;
   		border-radius: 10px;
   }

   .tweet {
   		background: url(../images/tweet.jpg) no-repeat right 75px;
   }

   input[type="text"] {
   		width: 100%;
   		padding: 10px 5px;
   		margin-bottom: 20px;
   		border: 1px #AAA solid;
   }
…and finally, here is the result in a snapshot from my browser:
Conclusion
These are the basic steps to integrating your design into a custom WordPress page template. Even though our content is static, we still have a custom layout that we designed ourselves.
Part three to this tutorial series will be coming soon. I will be covering the process of creating custom fields for the page template so that our content can come directly from WordPress!


Designing a custom WP is easy but your post has made it look super easy. Appreciate your efforts in writing this post to spread knowledge.
Thanks Jamil, I agree! I think people tend to overthink it, or just don’t know where to begin ;) I still intend to finish this three part series …two years later haha.
Great tutorials!!.
Really looking forward to Part III . When do you think you would release it?
Thanks! I’m hoping to have it published in the next couple of weeks. I will post an update in the comments so you get a notice ;)
This is priceless! So nice of you to share this, I will tell everyone about this! hehe.
Thank you! :-D
You’re welcome! I’ll post here when part 3 is finished.
Hey Chris
This is a really nice and easy tutorial to follow!
Thank you for creating it!