Company Website:
www.RevelationConcept.com
Presentation Slides:
www.RevelationConcept.com/presentations
Twitter:
@RevConcept
www.RevelationConcept.com
www.RevelationConcept.com/presentations
@RevConcept

A long title for a simple concept: let’s start creating great user experiences for our clients…on the backend!

You know nothing about WordPress
Instead, put some thought and consideration into your build process. Sometimes a simple solution for the clients means more work for us — but that’s ok!
1.) Look thoughtfully at the layout, the content and the design.
2.) Utilize traditional reading style: top to bottom, left to right.
3.) Call it what it is: a section/area, a heading, an intro, a CTA, a button, a box etc.
4.) Decide what “makes sense” — build the form to function relationship.*
Step one to becoming a WordPress Wizard — utilize magic.
A post meta box is a draggable box shown on the post editing screen. Its purpose is to allow the user to select or enter information in addition to the main post content. This information should be related to the post in some way.*
Custom fields are post metadata.*
Post metadata is data that’s saved in the wp_postmeta table in the database. Each entry is saved as four fields in this table:
1.) meta_id: A unique ID for this specific metadata.
2.) post_id: The post ID this metadata is attached to.
3.) meta_key: A key used to identify the data.
4.) meta_value: The value of the metadata.
Natively, WordPress pages and posts come with a few built-in metaboxes and fields (title, content editor, categories).
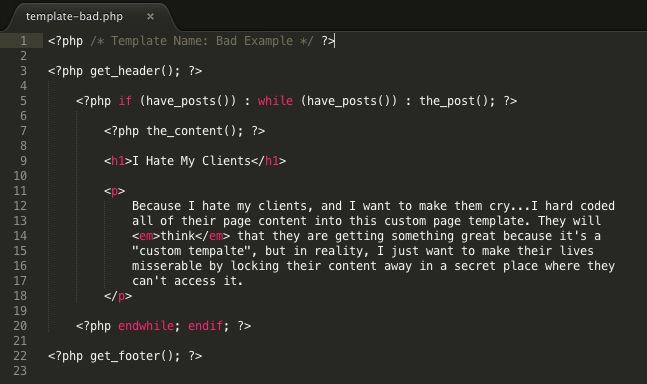
But often times our clients have content that doesn’t fit these predefined inputs. Trying to force their content to fit is what leads to bad practices like the examples we looked at in slides 2 and 3.
The solution is to build the Content Management System (CMS) around their content — Custom Metaboxes and Fields are one tool we can utilize when working toward this goal.
1.) Setup by hand (the cowboy solution)
Resources: The Codex (Metaboxes), The Codex (Custom Fields), Smashing Mag Tut
2.) Use “Custom Metaboxes and Fields” (CMB) — an awesome project by Bill Ericson, Andrew Norcross, Jared Atchison and Justin Sternberg
Resource: Custom Metaboxes and Fields
3.) Use “Advanced Custom Fields” — the greatest plugin ever created.*
Resource: Advanced Custom Fields
Step two to becoming a WordPress Wizard — utilize more powerful magic.
Native WordPress post types: post, page, attachment, revision and navigation menu.
Custom post types are new post types you can create.
A custom post type can be added to WordPress via the register_post_type() function. This function allows you to define a new post type by its labels, supported features, availability and other specifics.
1.) Staff Members
2.) Products
3.) This Presentation :)
4.) Portfolio/Project Items*
Custom Post Types simplify content management by allowing us to organize and display client content in a way that is unique to that particular content.
Coupling Custom Post Types with Custom Fields can remove nearly any limitation to granting your client full content control.
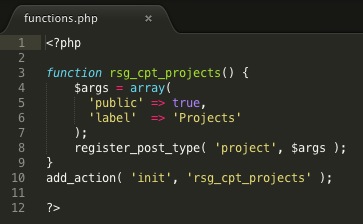
Add these lines of code to your functions.php file — or better yet — to a functionality plugin.

Tailoring post and page displays to fit client content.
Custom Templates are files that give us the ability to make pages or posts display or behave differently from their defaults.
We can create templates based on our needs and tell WordPress when and where to use them.
This is how we display our custom post types, metaboxes and fields.
1.) Make a copy of the page.php file (or you can start from scratch).
2.) Rename your copied file so you can easily identify it ex.) template-services.php
3.) Make your code changes — add/remove any elements, custom PHP etc.
4.) Tell WordPress this is a page template, add this PHP comment at the top of your file:
<?php /* Template Name: Services Page */ ?>
1.) Make a copy of the single.php file (or you can start from scratch).
2.) Rename your copied file to follow this structure: single-{post-type}.php
3.) Make your code changes — add/remove any elements, custom PHP etc.
1.) Make a copy of the archive.php file (or you can start from scratch).
2.) Rename your copied file to follow this structure: archive-{post-type}.php
3.) Make your code changes — add/remove any elements, custom PHP etc.

Making your clients the kings of their content.
If your client’s are constantly contacting you to make changes to their site, what was the point in using WordPress?
1.) Hard-coding menus into widgets*
2.) Hard-coding menus into themes
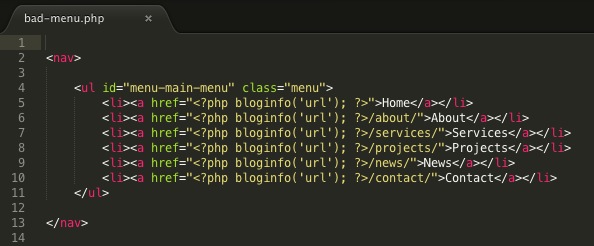
Don’t hard-code your client’s menus into the theme where they can’t access them…it’s mean.
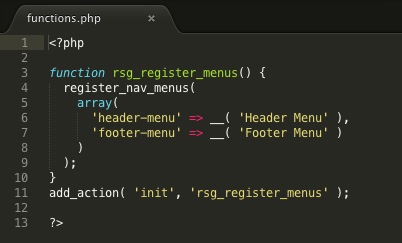
Add these lines of code to your functions.php file — or better yet — to a functionality plugin.

Add these lines of code to your header.php file if you are setting up the main site menu — or to any other theme file where you want your custom menus to appear.
Now, your clients can control their menu items, menu order and menu labels!*
A great add-on to Advanced Custom Fields is the Options Page.
This add-on allows you to create a menu item in the admin called “Options”. With this menu item you can then extend your client’s ability to control more advanced site-wide features.
1.) Site Logos
2.) Custom Header Images
3.) Social Networks/Icons
4.) Footer Area Controls (replaces widgets)*
Protect your clients and yourself by considering a few extra steps.
By adding a “Help” section to the admin area, we can create a place for our clients to go first, before they contact us.*
1.) Video Tutorials! (iShowU + Stomp)
2.) Step-by-step instructions
3.) Screenshots
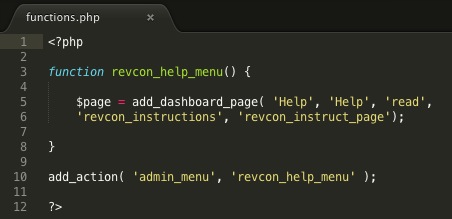
($page_title, $menu_title, $capability, $menu_slug, $function)
Add these lines of code to your functions.php file — or better yet — to your own admin plugin.

Add these lines of code to your functions.php file — or better yet — to your own admin plugin.
Consider “cleaning up” the admin area to simplify your client’s user experience.
1.) Removing/hiding unneeded menu items
2.) Reordering menu items
3.) Renaming the default “Post” menu item*
Consider assigning your client a WordPress user role other than Admin.
1.) Can my client “handle” being an Administrator?
2.) Will the additional menu items/options be confusing?
If your client shouldn’t “touch” it, then it shouldn’t be there!*
1.) Assign an Editor and add/remove capabilities as needed
2.) Use a plugin to create and define user roles
Even if you assign your client an Editor role, be sure they — or someone in their company — also has access to Administrator credentials.*

Using portability to protect your client’s future.
Don’t let the word “plugin” intimidate you. If you’ve played with your functions.php file, you’re golden!
A functionality plugin houses your custom functions that are not necessarily tied to your theme. Think of it as a portable functions.php.
1.) Is this content? Content should be portable.
2.) Is this something specific to my theme/design? Leave it.
“A good rule-of-thumb is that anything a user would expect to keep after changing themes belongs in a plugin. This includes custom post types, taxonomies, metaboxes, and shortcodes.”
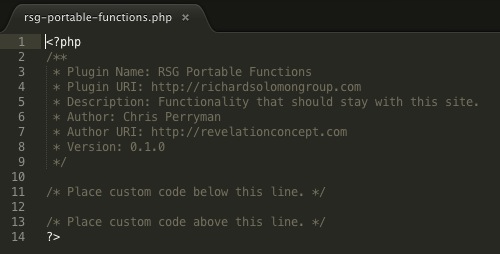
That’s it! Add your functions to the plugin and save it in your plugin directory:
/wp-content/plugins/rsg-portable-functions.php
Contact me with your questions!
Example files from the sample site are on GitHub: